Quick Start Guide
Never run an AI agent? No Problem! We'll walk you through it.
Think of your kit as your AI Assistant's playbook. The Founder's Kit is a software package (prompt libraries, runbooks, plugins, scripts, templates) that instructs your AI assistant to build your business with you. This page takes you from "I don't have an AI Assistant" to "My AI Assistant is interviewing me about my business idea." Most people finish in about ten minutes.
What you need before you start
- Your kit: you received a link to the GitHub repo as well as a .zip file downloaded from your order page. Find troubleshooting FAQs at the bottom of this page.
- A paid AI assistant account (typically the $20/mo option will do fine): a Claude Pro or Max plan, ChatGPT Plus, or similar. Don't have one? No problem! This guide assumes you do not already have an AI Assistant. If you do, great! Skip step 2.
- A Mac or Windows computer. Purchased on your phone? Open your receipt email on your computer and use its order-page link there.
If you are having any issues at all getting set up, please email us at support@thefounderkit.ai.
Download the Kit
Your kit comes two ways: a zip file or the private GitHub repo, both from your order page. Pick one option below and skip the others; they all end in the same place.
Option 1a: Download the zip (click to expand)
- From your order page, download the zip. It lands in your Downloads folder.
- On a Mac: double-click the zip file. A folder with the same name appears next to it.
- On Windows: right-click the zip file, choose Extract All, then click Extract. A folder appears.
- Drag that folder onto your Desktop. You can also right-click the folder, choose Move, and select your Desktop folder. That folder is your kit. Everything from here on happens inside it.
✓You are done with this step when there is a kit folder on your Desktop, and double-clicking it shows files inside.
Option 1b: Already use GitHub? Clone the repo (click to expand)
- Click the link to the private GitHub repo you now have access to as a paying customer, and sign into GitHub if you aren't already.
- Clone it the way you normally do: copy the address from the green Code button and git clone, or use GitHub Desktop. The clone is your kit folder.

- A cloned kit keeps itself current: when the kit's tools improve, your AI offers the update at the start of a session, and your business files are never touched.
✓You are done with this step when the kit folder sits wherever you keep your projects.
Option 1c: Terminal (advanced) (click to expand)
Signed into GitHub with your terminal set up? This is the whole step:
git clone https://github.com/thefounderkit/launch-kit.git
cd launch-kit✓You are done with this step when the clone finishes and you are inside the kit folder.
Set up your AI assistant
Skip this step if you already have a desktop coding agent.
The Founder's Kit is AI-agnostic, meaning it does not matter which AI Assistant you use. Pick one option below, whichever assistant you prefer.
Option 2a: Claude (click to expand)
- Desktop App Required:Please note that The Founder's Kit does not work on the web app (e.g. claude.ai/code) due to limitations of the sandboxed environment. If you're using a browser coding agent, please stop and use the desktop app instead (advanced users, see FAQ "Run the kit on the web app anyway").
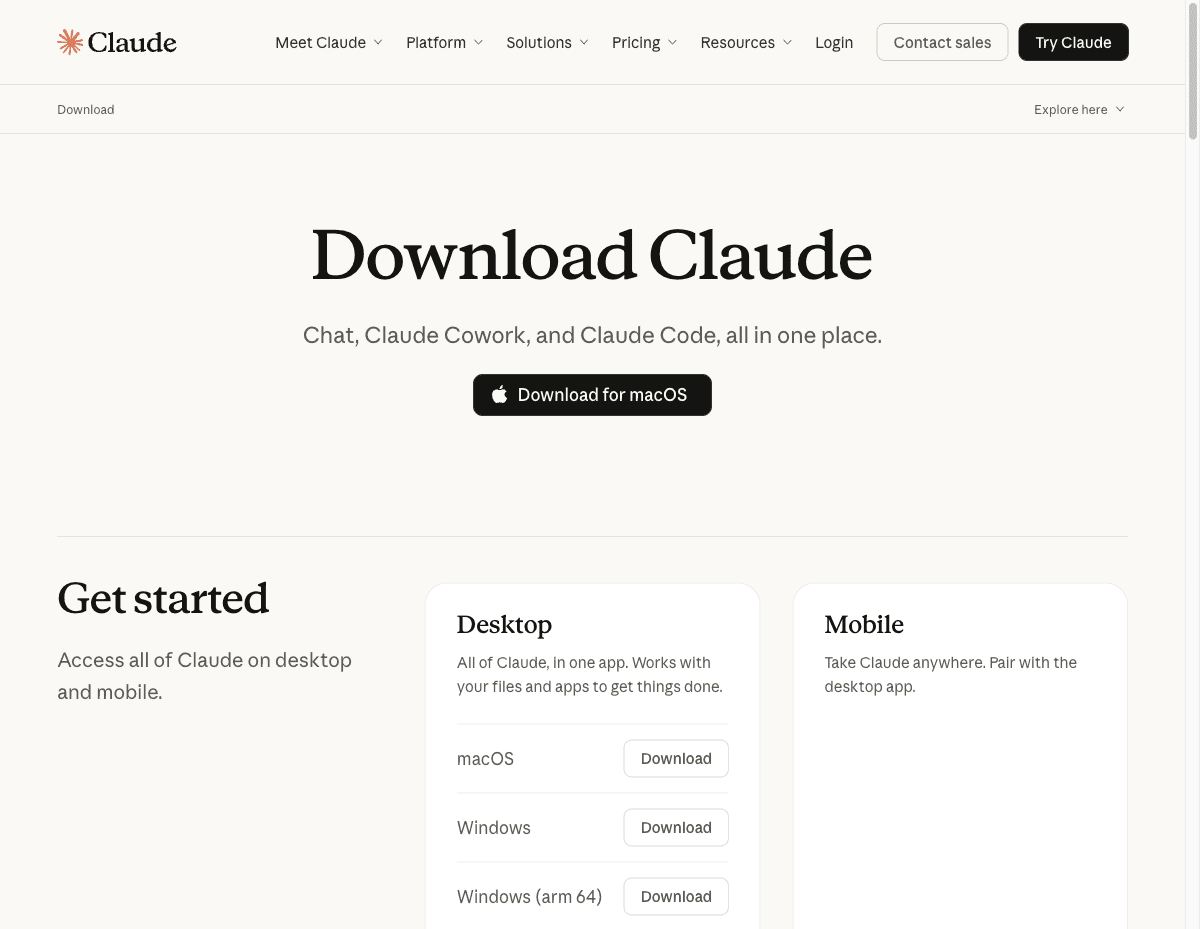
- In your web browser, go to claude.ai/download.
- Click the download button for your computer (macOS or Windows).
- Open the downloaded file. On a Mac, drag the Claude icon into Applications when asked, then open Claude from Applications. On Windows, run the installer and let it finish; Claude opens when it is done.
- Sign in with your Claude account.
- Go to git-scm.com/downloads/win and download the installer.
- Run it and accept every suggested option: keep clicking Next, then Install. None of the choices need changing.
✓You are done with this step when the Claude app is open and you are signed in.
Option 2b: Codex (click to expand)
- Desktop App Required:Please note that The Founder's Kit does not work on the web app (e.g. claude.ai/code) due to limitations of the sandboxed environment. If you're using a browser coding agent, please stop and use the desktop app instead (advanced users, see FAQ "Run the kit on the web app anyway").
- Codex comes with a paid ChatGPT plan, inside the ChatGPT app for Mac.
- In your web browser, go to openai.com/codex and click Download for macOS.
- Open the downloaded file, install it, and sign in with your ChatGPT account.
- On Windows, Codex runs in the terminal instead of an app. START_HERE.md, the first file inside your kit folder, has those steps.
✓You are done with this step when Codex is open and you are signed in.
Desktop App Required:Please note that The Founder's Kit does not work on the web app (e.g. claude.ai/code) due to limitations of the sandboxed environment. To use the web app, you must have advanced programming skills (see FAQ "Run the kit on the web app anyway").
Open your kit inside your AI assistant
Inside the desktop app (Claude, ChatGPT, or other), point your AI assistant at the kit from step 1. Pick the one option below that matches the assistant you set up in step 2.
Option 3a: Claude (click to expand)
- The app opens on its home screen (the Chat tab). The kit cannot run there. At the top of the Claude app, click Code.
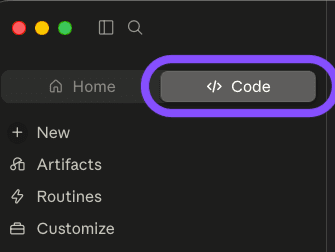
- The app asks where you want to work. Choose Local, which means: on this computer.
- Click Select folder and pick the kit folder from step 1.
- In the small menu next to the send button, choose Autoif it's offered. Routine setup steps then run without asking your permission every time; the big moments still wait for your yes.
- If a button is not where this page shows it, the app has updated its look. Follow the names: Code, Local, Select folder.
Option 3b: Codex (click to expand)
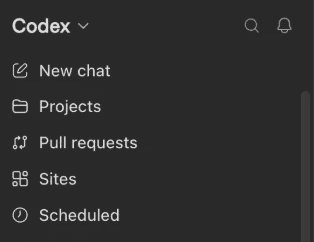
- In the app's left panel, click Codex, then New chat.
- Since you are starting a new chat, you only need to open the right folder: choose your kit in the project picker above the message box. Not listed yet? Click New project and pick the kit folder from step 1.
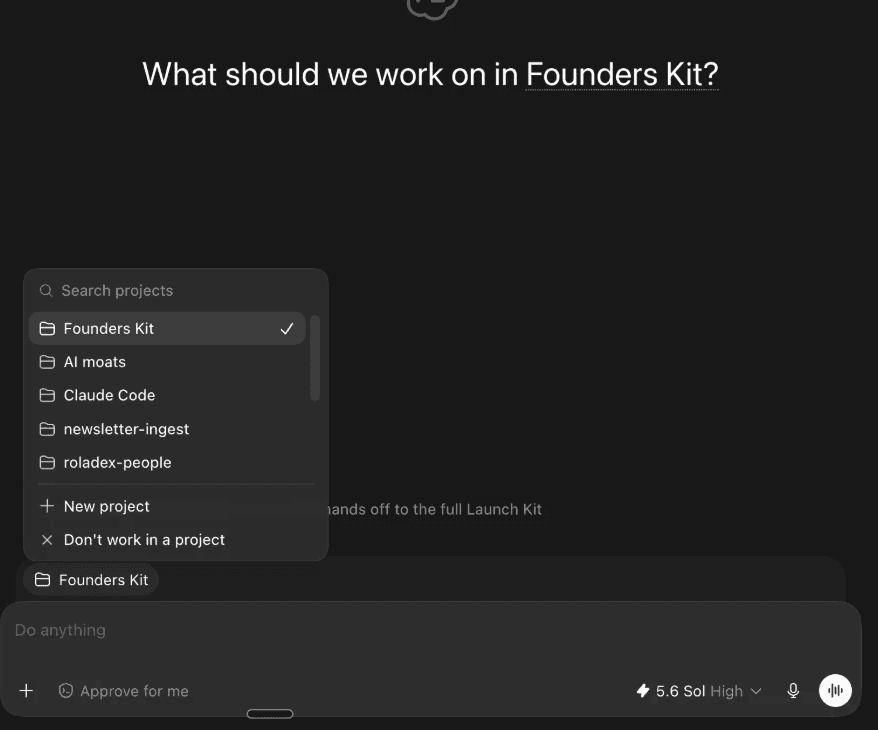
✓You are done with this step whenyou see a message box ready for typing, with your kit folder's name showing above or beside it.
Paste the prompt below
This one tells your assistant to start your kit.
Click Copy below, Paste into the chat window in your AI Assistant, then Click Enter.
Start my startup kit. First, make sure you are in the kit folder: it has an AGENTS.md or CLAUDE.md file and a "playbooks" folder. If they are not here, do not start over or guess: look on my Desktop, Documents, and Downloads for the folder that has them, move into it, and tell me where you found it. Then follow the kit's contract (AGENTS.md / CLAUDE.md), show me the welcome, and interview me to build my business one phase at a time, pausing for my approval before anything goes public.What happens next: your AI assistant checks it can see your kit, shows the welcome, and asks its first question. Answer in your own words. You are now a Founder!
- As it works, your assistant asks your permission before each piece of work, with an Allow or Accept button. Saying yes is normal. Asking first is how the kit keeps you in charge.
✓You are done with this page when your assistant has welcomed you and asked about your business idea. From here, it leads and you decide.
Getting around in Claude
Two minutes of orientation so nothing on screen looks strange. Claude is a chat window with a work area attached; you never need to memorize commands, and plain English always works.
- The gray boxes of computer text. As Claude works, it shows the commands it runs and the files it edits in gray, collapsible boxes right in the chat. That is Claude showing its work. You never need to read or touch them.
- The suggested next message. Sometimes gray text appears in the typing box suggesting what to say next. Press Tab to take the suggestion, then Enter to send it. Ignoring it and typing your own words is always fine.
- The permission boxes. When Claude wants to do a real piece of work, a box asks first: click Allow. The Auto choice from step 3 keeps the routine ones quiet; the big moments still ask.
- The tabs and the sidebar. Chat, Cowork, and Code sit at the top of the app; the kit lives in Code. The left sidebar lists your work sessions; yours is the one named after your kit folder, and clicking it brings your kit right back.
- Settings.You don't need to change any. The kit arrives already set up, and if a setting ever matters, Claude will say so and walk you through it.
- Ever lost? Close the session, open a fresh one in the kit folder, and paste the pick-up line from the FAQs below. Nothing is ever lost; the kit saves your progress to files as it goes.
Here's what it looks like when you get the Founder's Kit up and running!
One minute, real footage: the welcome, the interview, and the first phase closing.
Good to know
This is the quick start guide for the standard kit. Setting up a family kit? Use the Family Quick Start Guide.
You can pause, stop, and restart, at any time.
The kit saves your progress after every phase and every decision. Close the app whenever you like. To come back, open your kit the same way as step 3 and paste: "Continue my kit." Your assistant picks up exactly where you left off.
If something looks wrong
Ask your assistant first. It can check the kit itself and explain what it finds. Copy this message to it:
Something isn't working. Run the kit's doctor script and tell me in plain English what it found and what I should do next.If that does not sort it out, email support@thefounderkit.ai and include what your assistant told you.
Troubleshooting FAQs
The fastest fix for almost everything is a paste. Find your situation, copy the grey line, paste it to your assistant, press Enter.
My AI says it can't find the kit
Check what it can actually see:
Are you able to run commands and write files on my computer right now? Run a quick test, and tell me plainly: yes or no, and what folder you're in.If the answer is no, or the wrong folder, paste the step 4 prompt again. It tells your assistant how to find the kit on your Desktop, Documents, or Downloads.
Something failed, or there's an error on screen
Something on screen looks like an error. Explain in plain English what it means, whether my business is still okay, and what you're going to do about it, one step at a time.The same step keeps failing
This same step has failed more than once. Stop retrying it. Run scripts/doctor.sh, tell me in plain English what's actually wrong, and give me 2 or 3 options, including skipping this for now if that's safe.I hit my plan's usage limit mid-session
Nothing is lost. Limits reset on their own, and the message on screen says when. When it resets, open a fresh session in the kit folder and paste:
Pick up my kit where it left off: read PROGRESS.md, .kit/state.env, and .kit/decisions.log, run verify/verify-all.sh, then tell me in two sentences where things stand and what's next.My AI seems confused, repeating itself or forgetting decisions
Don't argue with it. Close the session, open a fresh one in the kit folder, and paste:
Pick up my kit where it left off: read PROGRESS.md, .kit/state.env, and .kit/decisions.log, run verify/verify-all.sh, then tell me in two sentences where things stand and what's next.Fresh sessions are free, and the kit keeps everything in files.
My laptop closed, or the session crashed
Same answer: fresh session, then the pick-up line above. Progress is saved to files after every phase and every decision.
My AI asks permission before everything. Is that normal?
Yes. Saying yes is normal, and asking first is how the kit keeps you in charge. To cut the asking way down, choose Auto in the small menu next to the send button (if it's offered): routine steps then run on their own, and the big moments (anything public, anything money) still wait for your yes.
On Windows, the kit's checks won't run (bash not found)
Install Git for Windows (Option 2a, the Windows box). If it's installed and your assistant still can't find it, paste:
Set CLAUDE_CODE_GIT_BASH_PATH in my Claude Code settings to C:\Program Files\Git\bin\bash.exeMy AI says it can't reach the internet, or a sandbox blocks a website
Nothing is broken, and your Wi-Fi is fine. This happens when the kit is opened on the claude.ai website or in a Cloud session: those run on a faraway computer that can only reach a short list of websites, and the kit's services aren't on it. The kit runs on your computer. Open the desktop app from step 2, click Code, then New session. Just above the box where you type, set the first choice to Local, pick your kit folder, and paste the step 4 prompt again. When Claude asks to allow something, click Allow. Or paste this where you are:
You said you can't reach the internet or a website. Tell me plainly: is this session blocked from the internet? If it is, walk me through reopening my kit in the Claude desktop app in a Local session (Code tab, New session, set to Local, pick my kit folder), one step at a time, and wait for me.Can I run the kit on the claude.ai website instead?
No. The website can chat, but it can't open the folders on your computer. Use the desktop app from step 2.
Run the kit on the web app anyway (advanced)
Cloud sessions can only reach an approved list of websites, so first you approve the kit's services. On claude.ai/code, click the cloud button above the message box, hover over your environment, and click the settings icon that appears. Set Network access to Custom, tick "Also include default list of common package managers", then paste these into the Allowed domains box (one per line) and save:
bun.sh
api.stripe.com
*.supabase.co
*.supabase.com
api.resend.com
vercel.com
api.vercel.com
*.vercel.app
thefounderkit.aiStart a new session after saving; a running session keeps its old rules. The desktop app is still the supported road: a cloud session can't open the folders on your computer, and a few steps (your private dashboard, and putting your site live) expect your own machine. The kit will say so when it matters.
Still stuck?
Email support@thefounderkit.ai with your order reference and what the check above said. A human replies.